The ServerEngine API is used to send jobs to the Job Planner. Only predefined hosts and packages can be assigned via the API. Assigning non-existent hosts or packages will result in them being disabled & saved in the Job Planner. The API is protected with authentication, but communication is not encrypted. If you plan to expose the API to the internet, we strongly recommend using a reverse proxy with HTTPS for secure transmission.
Prepare Windows for API Calls #
Allow your selected port and IP trough your Windows firewall
Note: This is auto-configured since ServerEngine v.3.2.2 and up.
Call API from Windows #
Prepare PowerShell Script #
Username is always admin, replace $password with your own ServerEngine credentials.
$username = “admin”
$password = “cforce-it.com”
Replace with a existing PKG you want to assign to the automation.
Time = “17:28” (Format 24h)
Date = “2024/11/04”
RepeatInterval = “One time”
Host = “AD-CA-FS.CForce-IT.network”
Package = “Showcase_Monitoring”
Status = “Enabled”
Intervals

Replace “http://localhost:5000/” with your own ServerEngine IP-Address and port.
or https://server-name:5555/ using Reverse Proxy -> https://serverengine.co/docs/api-https-reverse-proxy/
Call using PowerShell #
# Define the username and password
$username = "admin"
$password = "cforce-it.com"

# Encode the credentials
$pair = $username+":"+$password
$encodedCredentials = [Convert]::ToBase64String([Text.Encoding]::ASCII.GetBytes($pair))

# Create the headers
$headers = @{
    "Content-Type"  = "application/json"
    "Authorization" = "Basic $encodedCredentials"
}

# Create the body
$body = @{
    Time           = "17:28"
    Date           = "2024/11/04"
    RepeatInterval = "One time"
    Host           = "AD-CA-FS.CForce-IT.network"
    Package        = "Showcase_Monitoring"
    Status         = "Enabled"
} | ConvertTo-Json

# Make the POST request
$response = Invoke-WebRequest -Uri http://localhost:5000/ -Method POST -Headers $headers -Body $body

# Output the response content
$response.Content
Call API from Linux #
Prepare Bash Script #
Replace user -u with your own ServerEngine credentials if changed.
-u admin:cforce-it.com (username:password)
Replace “http://localhost:5000/” with your own ServerEngine IP-Address and port.
Replace with a existing PKG you want to assign to the automation.
“Time”: “12:01”, (Format 24h)
“Date”: “2024/08/05”,
“RepeatInterval”: “Repeat: never”,
“Host”: “WIN-SRV-AUS.CForce-IT.network”,
“Package”: “Server Deployment”,
“Status”: “Enabled”
Intervals
Check CURL #
CURL is usually already on most Linux Destributions if not install it with:
Ubuntu/Debian-based systems:
sudo apt install curl -y
Red Hat-based systems (RHEL/CentOS/AlmaLinux)
sudo yum install curl -y
Call using CURL #
curl -u admin:cforce-it.com -X POST http://localhost:5000/ \
     -H "Content-Type: application/json" \
     -d '{
           "Time": "12:01",
           "Date": "2024/08/05",
           "RepeatInterval": "One time",
           "Host": "WIN-SRV-AUS.CForce-IT.network",
           "Package": "Server Deployment",
           "Status": "Enabled"
         }'
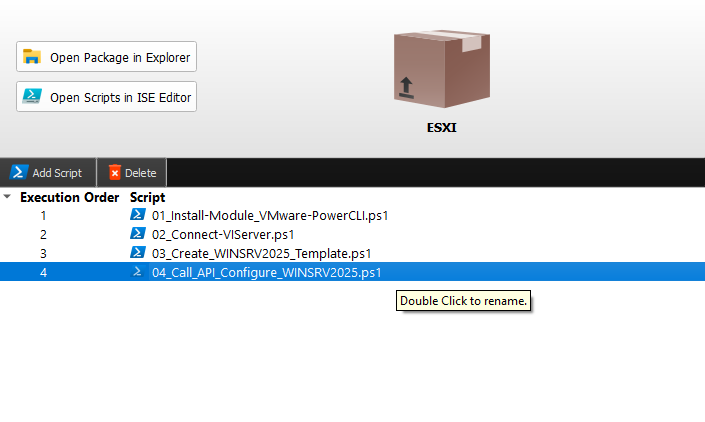
Incorporate API Calls into PKG #
Example: VM Deployment with ESXI and Windows Server 2025 configuration after VM creation.
# Define the username and password
$username = "admin"
$password = "cforce-it.com"

# Encode the credentials
$pair = $username+":"+$password
$encodedCredentials = [Convert]::ToBase64String([Text.Encoding]::ASCII.GetBytes($pair))

# Create the headers
$headers = @{
    "Content-Type"  = "application/json"
    "Authorization" = "Basic $encodedCredentials"
}

# Create the body
$body = @{
    Time           = "18:00"
    Date           = "2024/12/01"
    RepeatInterval = "One time"
    Host           = "WINSRV2025_TEMP.CForce-IT.network"
    Package        = "Configure_WINSRV2025"
    Status         = "Enabled"
} | ConvertTo-Json

# Make the POST request
$response = Invoke-WebRequest -Uri http://localhost:5000/ -Method POST -Headers $headers -Body $body

# Output the response content
$response.Content
Advanced: List jobs from API #
Step 1: Close ServerEngine #
If ServerEngine is running job tasks may disappear before requesting the list.
Step 2: Call API with GET #
Note: ServerEngine checks every 15 seconds for new job tasks and retrieves them.
After retrieval, the tasks are assigned to the “Job Planner” and deleted from the API using the Job Task ID.
If ServerEngine is not running jobs stay in the API untill retrieval.
To get the list of job tasks you can manually call Method “GET” (replace Uri with own server and port).
Note: In this example we are using HTTPS with the revery proxy on port 5555
$response = $null
$username = "admin" #user must be admin
$password = "cforce-it.com" #default password
$pair = $username+":"+$password
$encodedCredentials = [Convert]::ToBase64String([Text.Encoding]::ASCII.GetBytes($pair))
$headers = @{ Authorization = "Basic $encodedCredentials" }
$response = Invoke-WebRequest -Uri "https://servername.domain.network:5555/" -Method GET -Headers $headers
$response.Content
Advanced: Delete jobs from API with ID #
If ServerEngine crashes duo to malformed API job task, you can manually delete the task using the job task ID.
Step 1: Get job task list #
Use methode GET above.
Copy the ID:
{
    "id":  "2285fe93-e7f6-4fe4-8cf8-bdcedf0de424",
    "Time":  "07:42",
    "RepeatInterval":  "One time",
    "Host":  "(This Computer)",
    "Status":  "Enabled",
    "Package":  "Example_01_WRITE-LOG",
    "Date":  "2025/09/06",
    "jobParams":  {
                      "custom1":  "TextValueExample1",
                      "custom2":  "TextValueExample2",
                      "custom3":  "TextValueExample3"
                  }
}
Step 2: Delete job task #
To delete a job we can use the methode DELETE
Delete job task using the ID:
# Define the username and password
$username = "admin" #user must be admin
$password = "cforce-it.com" #default password
# Encode the credentials
$pair = $username+":"+$password
$encodedCredentials = [Convert]::ToBase64String([Text.Encoding]::ASCII.GetBytes($pair))
# Create the headers
$headers = @{"Authorization" = "Basic $encodedCredentials"}
# Define the job ID to delete
$jobIdToDelete = "2285fe93-e7f6-4fe4-8cf8-bdcedf0de424"
# Make the DELETE request
$response = Invoke-WebRequest -Uri "https://servername.domain.network:5555/?id=$jobIdToDelete" -Method Delete -Headers $headers
# Output the response content
$response.Content
You should see confirmation for deletion:
{
    "status":  "Job task removed successfully"
}